


Most people who try to create a membership site spend two weeks configuring plugins before they realise the setup they followed doesn’t actually work the way they assumed. The most common version of this: install WooCommerce, install WooCommerce Memberships, install WooCommerce Subscriptions, try to connect them, discover that billing and access control are two separate systems that only loosely talk to each other, then start Googling for answers.
There’s a simpler path. This guide shows you how to create a membership site on WordPress without stacking three plugins from different teams. You’ll know exactly what to install, what to set up first, and what to test before you let anyone pay you.
By the end, you’ll have a fully working membership site — content protection, payment processing, subscription billing, and access control — built on a single plugin architecture that you actually understand.
Quick Answer: How do you create a membership site?
- Step 1 — Get WordPress hosting and a domain. Self-hosted WordPress.org gives you full control. Managed hosts like SiteGround or Kinsta make the technical setup fast.
- Step 2 — Install a membership plugin. StoreEngine handles content restriction, subscription billing, and ecommerce from one plugin without WooCommerce. MemberPress is the alternative for course-heavy sites.
- Step 3 — Create your access tiers. One Access Group per membership tier. Assign content — pages, posts, categories, files — to each group.
- Step 4 — Connect payment and set up billing. Stripe handles recurring subscription billing. When a payment succeeds, access activates. When it fails or cancels, access gates automatically.
- Step 5 — Set up your pricing page and test everything. Create a public pricing page from the plugin’s shortcode. Test the full signup and access flow in an incognito window before launching.
Why Build a Membership Site on WordPress?
A membership site is a website where visitors pay — monthly, annually, or once — to access content, courses, downloads, or community that isn’t publicly available. The business model is recurring revenue: instead of chasing new sales every month, you build a subscriber base that generates predictable income.
The subscription economy is projected to reach $2.13 trillion by 2034, growing at a 15.9% compound annual growth rate (Market.us, via MemberPress). And subscription-based companies can be worth up to 8 times more than comparable transaction-based businesses (Integra Brokers). The math of recurring revenue is simply better than one-time sales at almost any scale.
WordPress powers 43.4% of all websites on the internet as of 2025 (W3Techs) — and it’s the most widely used platform for membership sites because it gives you full ownership of your content and your data, full flexibility over design and features, and a flat annual cost that doesn’t scale with your member count the way hosted platforms do.
The alternative — hosted platforms like Kajabi or Circle — charge $149–$199/month regardless of whether you have 10 members or 1,000. On WordPress, your hosting costs $10–$30/month, and your membership plugin is a flat annual fee. At 200 members, the difference is significant. At 1,000 members, it’s the difference between a profitable business and one that’s barely breaking even on platform costs.
What You Need Before You Start
Before installing anything, nail down three decisions:
What are you selling access to?
Content library (articles, videos, downloads), online courses (structured with LMS), community (forum, group, live events), or some combination. Your answer determines which features you actually need from a membership plugin.
How many tiers?
One tier is simpler to launch. Two tiers (a lower-cost entry and a higher-cost core) capture a wider range of buyers. Three tiers adds a premium anchor that makes the middle tier look like the obvious choice. Don’t start with four or more — it overwhelms buyers and fragments your member base.
Monthly or annual billing?
Monthly has the lowest commitment barrier and the highest churn risk. Annual dramatically improves retention and cash flow — members who pay annually are far less likely to cancel in month three than those on monthly billing. Offer both and present annual first.
Step 1: Get a Domain and WordPress Hosting
Your domain name should be short, memorable, and easy to say out loud. Register it at Namecheap or Cloudflare Registrar — keep it separate from your hosting so you can switch hosts without domain complications.
For hosting, choose managed WordPress hosting. SiteGround starts at $5.99–$14.99/month and handles WordPress installation, SSL, and caching out of the box. Kinsta or WP Engine if you expect significant traffic from day one. The minimum specs you need: PHP 8.1 or higher, at least 256MB WordPress memory limit, SSD storage, and a free SSL certificate.
After signup, most managed hosts give you a one-click WordPress installer. Use it. Then immediately:
- Go to Settings → Permalinks, select “Post name.” Clean URLs matter for SEO and for the member-facing links your plugin generates.
- Activate your SSL certificate. Every payment gateway requires HTTPS — this is non-negotiable.
- Delete unused default themes and plugins. A clean install means fewer conflicts.
Step 2: Choose and Install Your Membership Plugin
This is the decision that determines everything else. Get it wrong, and you’ll spend weeks fighting plugin conflicts. Get it right, and the rest of the setup is configuration, not troubleshooting.
Here’s the honest breakdown of the main options:
StoreEngine — a standalone WordPress ecommerce plugin with a Membership addon and Subscription addon. Handles content protection, recurring billing, product sales, and digital downloads from one plugin. No WooCommerce required. This is the right choice if you sell products or digital downloads alongside membership, or if you want to avoid the WooCommerce dependency entirely.
MemberPress — the most popular dedicated membership plugin. Excellent for course-heavy sites (built-in LMS, quizzes, drip content). No ecommerce beyond the membership itself — if you want to sell products alongside membership, you’d need to add WooCommerce separately.
Paid Memberships Pro — open-source, genuinely functional free tier, 60+ add-ons. Best for developers and budget-conscious builders who want maximum flexibility. More configuration required than MemberPress.
The WooCommerce mistake to avoid: WooCommerce Memberships ($199/year) requires WooCommerce as a base. WooCommerce Subscriptions ($199/year) is a separate plugin. Together, they cost $398/year and require you to maintain three plugin stacks — WooCommerce, Memberships, and Subscriptions — from a combination of different development teams. For most membership sites, this is unnecessary complexity. StoreEngine replaces all three.
To install StoreEngine:
Go to Plugins → Add New → search “StoreEngine” → Install → Activate. Then go to StoreEngine → Addons and activate the Membership Addon and the Subscription Addon. Both are included in the Pro plan.
Step 3: Create Your Access Groups (Membership Tiers)
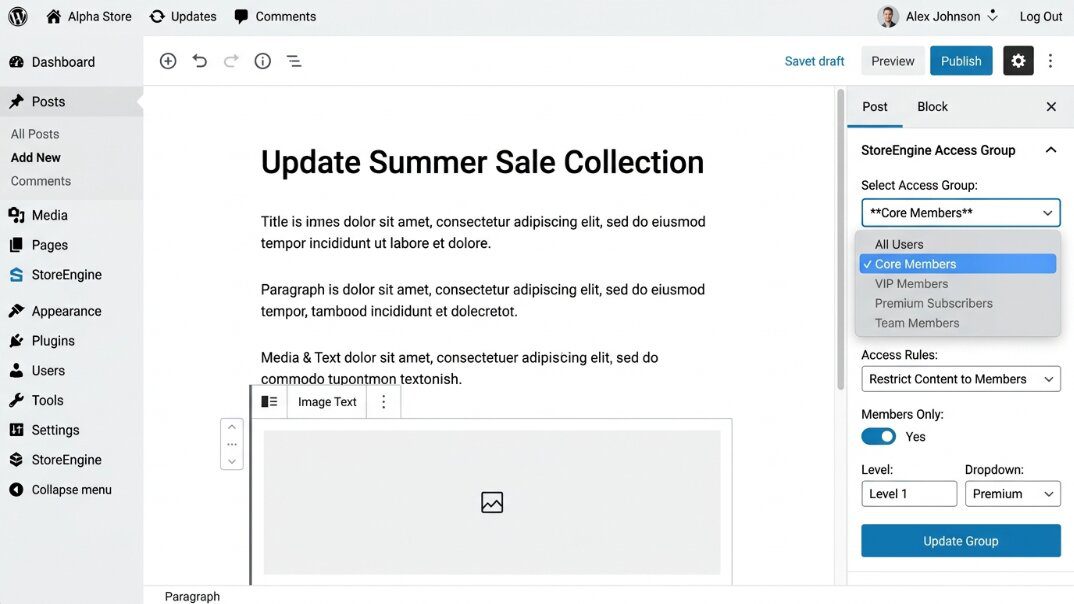
In StoreEngine, membership tiers are called Access Groups. Each Access Group defines who can access what content, and for how long. One Access Group per tier.
Go to StoreEngine → Membership → Access Groups → Add New.
For a two-tier membership:
- Create “Core Members” — set expiration to 30 days (for monthly subscribers). This extends automatically when the linked subscription renews.
- Create “Pro Members” — same expiration setting. Pro members can be added to both groups, so they inherit all Core content plus their exclusive Pro content.
For a three-tier membership, add a third group. The structure is always additive — higher tiers inherit lower-tier content; they don’t replace it.
Setting expiration rules:
- Monthly subscribers: 30 days
- Annual subscribers: 365 days
- Lifetime members: never expires
- Fixed-term (cohort programs): set a specific end date
The Subscription add-on extends the expiration automatically on each successful billing cycle. You set the expiration once, and the system manages it from there.
Step 4: Protect Your Content
Content protection means that non-members visiting a protected page see a redirect to your pricing page — not the content. And when a member’s subscription lapses, access turns off automatically without any manual action from you.
In StoreEngine, you can protect content at five levels:
Individual posts or pages — open any post in the editor, find the Access Group panel in the sidebar, and select the group. That post is now protected.
Entire categories — assign a category to an Access Group in the group’s settings. Every post in that category inherits the restriction. This is the most practical approach for content libraries — you never have to manually restrict individual posts again. Add a post to the right category and it’s protected automatically.
Files and downloads — protect direct URL access to PDFs, audio files, and other uploads. Without file protection, someone with the direct URL can download your files even if they’re not a member. StoreEngine blocks direct URL access at the server level — the file is never sent to non-members’ browsers.
Custom post types — protect LMS lessons, event listings, job board posts, or any other custom post type by assigning the post type to an Access Group.
Entire site — one toggle restricts all content to logged-in members. Public pages (pricing page, homepage, about) are listed as exceptions.
Writing restriction messages that convert:
Don’t use the default “Members only. Log in.” message. Write a specific upgrade CTA per Access Group: “This is Pro content — available to Pro members at $79/month. Upgrade to Pro to access this and 200+ other resources.” Include a direct link to your pricing page. The restriction message is a sales moment. Treat it like one.
Step 5: Connect Payment and Set Up Subscription Billing
Go to StoreEngine → Settings → Payments and connect Stripe. Stripe is recommended for subscription memberships — it handles recurring billing, automatic retries on failed payments, and the full subscription lifecycle cleanly.
Once Stripe is connected, go to StoreEngine → Subscriptions → Plans → Add New.
For each paid tier, create one subscription plan:
- Set the billing interval: monthly or annual
- Set the price
- Link the plan to the corresponding Access Group
That last step is critical. When you link a Subscription plan to an Access Group, payment events automatically control access:
- Payment succeeds → Access Group activates (or extends if renewing)
- Payment fails → grace period begins (configure 3–7 days in Subscription settings)
- Grace period ends without payment → Access Group deactivates
- Member cancels → subscription marked cancelled, access runs until end of current billing period, then Access Group deactivates
You set this up once. After that, the billing-to-access connection is fully automated.
For lifetime memberships:
Create a one-time purchase product in StoreEngine linked to a permanent Access Group (expiration: never). The member pays once. Their access never expires. No Subscription plan required for lifetime tiers.
Step 6: Set Up Your Pricing Page
Your pricing page is how non-members discover and join your membership. StoreEngine generates it via shortcode.
Go to StoreEngine → Membership → Pricing Page. Configure your tier cards:
- Tier name (Core, Pro, etc.)
- Monthly price
- Annual price (show the monthly equivalent: “$6.58/month billed annually”)
- Feature list for each tier (be specific — name what’s included, not just how many things)
Copy the shortcode and paste it into a new WordPress page. Name the page “Membership Plans” or “Join.” This page should be publicly accessible — never restrict your own pricing page.
Pricing page best practices:
- Show annual billing first and more prominently. Monthly should be the “try it first” option, not the default.
- Display dollar savings clearly on annual: “Save $94/year” outperforms “get 2 months free” in conversion.
- Add a short FAQ beneath the pricing cards: “Will I be charged automatically?” and “Can I cancel anytime?” are the two questions that kill conversions when left unanswered.
- One CTA per tier card — “Join Core” or “Get Pro.” Not “Join” and “Learn More” on the same card.
Step 7: Set Up the After-Purchase Redirect and Welcome Email
When a member completes a purchase, two things should happen immediately:
Redirect to a welcome page. Go to StoreEngine → Membership → Settings → After Purchase Redirect. Set this to a page you’ve created specifically for new members — not the homepage, not an empty dashboard. The welcome page should tell the new member exactly what to do first: where to go, what to read, where to ask questions.
Trigger a welcome email. StoreEngine fires a webhook on successful membership purchase. Connect this to Mailchimp, ConvertKit, or ActiveCampaign via Zapier or a native integration to send a welcome email within 5 minutes of signup. The first email should confirm access, tell them where to start, and set expectations for what they’ll receive.
The after-purchase experience is the most underbuilt part of most membership sites. Emotionally connected subscribers have a 306% higher lifetime value than merely satisfied customers (Business Wire, cited by MemberPress). That connection starts in the first 30 minutes — not the first 30 days.
Step 8: Test Everything Before You Launch
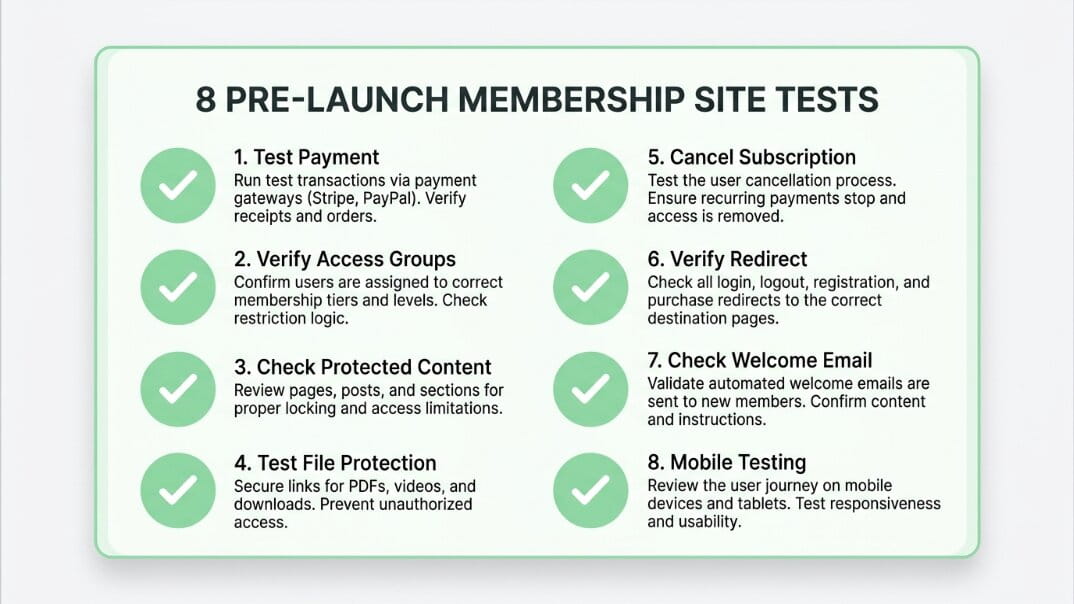
Run through this checklist before you share your pricing page with anyone. All eight must pass.
- Purchase a test membership using Stripe’s test card: 4242 4242 4242 4242
- Confirm the Access Group activates immediately after payment
- Visit a protected page as the test member — confirm access is granted
- Log out and visit the same page — confirm the redirect or restriction message appears
- Visit a protected file URL directly while logged out — confirm you can’t access it
- Cancel the test subscription — confirm access continues until the end of the billing period, not immediately
- Confirm the after-purchase redirect lands on your welcome page
- Run the complete signup and access flow on a mobile device
The logged-out test is the one most people skip. Admins bypass all restrictions — you need to test as a genuinely non-authenticated user to see what your visitors actually experience.
What Does a Membership Site Cost to Build?
|
Item |
Cost |
|
Domain name |
$12–$15/year |
|
WordPress hosting (SiteGround GrowBig) |
$5.99–$14.99/month |
|
SSL certificate |
Free (Let’s Encrypt, included with most hosts) |
|
StoreEngine Pro (Membership + Subscription addons included) |
Flat annual Pro plan fee |
|
Email marketing tool (Mailchimp free tier to start) |
$0–$20/month |
|
Total (Year 1, modest setup) |
~$150–$300/year |
Compare this to Kajabi at $149/month ($1,788/year) or the WooCommerce stack (WooCommerce core + Memberships $199/year + Subscriptions $199/year = $398/year plus hosting). The self-hosted WordPress + StoreEngine approach is significantly cheaper at any member count above a handful, and the cost stays flat whether you have 20 members or 2,000.
How to Create a Membership Site Without WooCommerce
The most common question from people who’ve read other guides: “Do I really need WooCommerce?”
The short answer: no. WooCommerce is a requirement for WooCommerce Memberships and WooCommerce Subscriptions — but not for StoreEngine, MemberPress, or Paid Memberships Pro. All three work without WooCommerce installed.
The longer answer: WooCommerce Memberships is a legitimate option if you’re already running a WooCommerce store and want to add membership features to an existing setup. But if you’re starting fresh and your primary goal is a membership site, adding WooCommerce just to get WooCommerce Memberships is an unnecessary dependency. You’re maintaining WooCommerce (core updates, security patches, compatibility testing) purely as a base for two add-ons you could replace with a single alternative plugin.
StoreEngine is built specifically to handle this use case: ecommerce, memberships, and subscriptions from one plugin, no WooCommerce dependency, and a single support channel for the whole stack.
Decision Framework: Which Membership Site Setup Is Right for You?
- You’re starting from scratch and want the simplest possible setup → install StoreEngine, activate Membership and Subscription addons, create one Access Group, connect Stripe, set up the pricing page. You can be live in a day.
- Your membership includes online courses with structured lessons, quizzes, and certificates → use StoreEngine with the Academy LMS integration, or use MemberPress with its built-in CourseCure LMS. MemberPress wins on built-in LMS depth; StoreEngine wins if you also need ecommerce alongside courses.
- You already have a WooCommerce store and want to add membership access → StoreEngine replaces the WooCommerce Memberships + Subscriptions combination. You get membership tiers, content protection, and subscription billing from one plugin that was designed to work natively with the StoreEngine ecommerce engine.
- You want a genuinely free starting point → Paid Memberships Pro’s core plugin is free, GPL-licensed, and includes unlimited membership levels and Stripe integration. Upgrade to a paid plan when your transaction volume makes the 2% Stripe fee cost more than the plan.
Frequently Asked Questions
How do I create a membership site on WordPress?
Install a membership plugin (StoreEngine, MemberPress, or Paid Memberships Pro), create one Access Group per membership tier, assign content to each group, connect a payment gateway (Stripe recommended), create subscription plans linked to each Access Group, and publish a pricing page using the plugin’s shortcode. Access activates automatically when payment succeeds and deactivates when the subscription cancels or lapses.
How much does it cost to create a membership site?
The minimum realistic budget is $150–$300/year for hosting, a domain, and a membership plugin on WordPress. This compares favourably to hosted platforms like Kajabi ($149/month = $1,788/year) or the WooCommerce Memberships + Subscriptions stack ($398/year, plus WooCommerce hosting overhead). The WordPress plugin approach costs a flat annual fee regardless of member count.
Do I need WooCommerce to create a membership site?
No. StoreEngine, MemberPress, and Paid Memberships Pro all work without WooCommerce. WooCommerce is only required for WooCommerce Memberships and WooCommerce Subscriptions. If you’re starting fresh, using a plugin that doesn’t depend on WooCommerce gives you a simpler, lighter architecture that’s easier to maintain.
What is the best plugin to create a membership site on WordPress?
It depends on what you’re building. StoreEngine is best when you need membership alongside ecommerce (selling products or digital downloads). MemberPress is best for course-heavy sites where a built-in LMS matters. Paid Memberships Pro is best for developers and builders who want open-source flexibility and a functional free tier. None of the three requires WooCommerce.
How do I protect content on a membership site?
In StoreEngine, assign pages, posts, or categories to an Access Group in the plugin settings. Non-members visiting a protected URL see a redirect to your pricing page or an inline restriction message. For files and downloads, file-level protection must be enabled — page protection alone doesn’t prevent someone from accessing a file via its direct URL. Test all protected content from an incognito browser window while logged out to verify that protection is working correctly.
How do I accept recurring payments on a membership site?
Connect Stripe in your membership plugin’s payment settings, then create Subscription plans linked to each Access Group. When a subscription payment succeeds, access extends automatically. When it fails, a grace period (typically 3–7 days) keeps access active while Stripe retries the payment. When a member cancels, access runs through the end of the paid billing period. All of this is automated once Stripe and the Subscription add-on are configured.
Can I offer a free tier on my membership site?
Yes. Create an Access Group with no linked Subscription plan. Assign limited content to it. Configure WordPress to automatically enroll all registered users in this group, or manually add users. Free members see enough to understand what paid tiers include — but not enough to replace the paid content. This is the most effective top-of-funnel strategy for converting visitors to paid members.
How do I accept recurring payments on a membership site?
Connect Stripe in your membership plugin’s payment settings, then create Subscription plans linked to each Access Group. When a subscription payment succeeds, access extends automatically. When it fails, a grace period (typically 3–7 days) keeps access active while Stripe retries the payment. When a member cancels, access runs through the end of the paid billing period. All of this is automated once Stripe and the Subscription add-on are configured.