


A store owner in Texas migrated her WooCommerce store to a new host. No backup. No redirect map. No staging test. Within 48 hours, her organic traffic dropped 70% — not because Google punished her for moving, but because 400+ product URLs silently returned 404 errors. She didn’t know until a customer emailed asking why the site was “broken.”
That story plays out thousands of times a year. And in almost every case, the damage was preventable.
WooCommerce migration isn’t hard when you know the order of operations. It’s devastatingly expensive when you don’t. This WooCommerce migration checklist covers every step — before, during, and after the move — so your data stays intact, your SEO rankings survive, and your customers never notice the difference.
And if you’re migrating away from WooCommerce because the plugin stack has become too heavy to manage — this guide covers that too. StoreEngine is a lightweight, all-in-one WordPress eCommerce plugin built for exactly that situation, with a dedicated WooCommerce Migration Add-on that moves your products, orders, and coupons in a few clicks. More on that later.
First — the checklist.
📌 What Is WooCommerce Migration?
The WooCommerce migration process is the structured method of moving a WooCommerce store to a new platform, host, or domain while preserving store data, checkout functionality, and SEO rankings. A complete migration includes a pre-migration audit, full backups, staging setup, data transfer, redirect mapping, payment gateway testing, DNS and SSL verification, search engine resubmission, and post-launch monitoring. Skipping any step can lead to broken checkout flows, lost data, or SEO ranking drops.
Common WooCommerce migration scenarios:
- Moving to a new hosting provider (same WordPress site, new server)
- Switching to a new domain name
- Migrating from WooCommerce to a different eCommerce platform
- Moving from another platform to WooCommerce
- Upgrading from one WordPress multisite environment to another
Each scenario has slightly different risks — but the checklist fundamentals apply to all of them.
⚠️ Why WooCommerce Migrations Go Wrong (The Data Is Sobering)

Before the checklist, understand what you’re protecting against.
68% of migrations fail due to improper redirects. Success requires treating migration as an SEO retention project, not just a technical data transfer.
The consequences of an unprepared migration:
- Broken internal links increase by 300% on average after improper migration, wasting crawl budget on 404 errors
- Sites using staging environment testing reduce critical errors by 70%
- Sites with comprehensive pre-migration audits recover 95% of traffic within 30 days vs. 90+ days for unprepared migrations
And the most jaw-dropping real-world case: when WooCommerce itself migrated from WooCommerce.com to Woo.com in November 2023, organic visibility plunged over 90% immediately. Traffic from Google cratered, and the company struggled for months before being forced to roll back to the original domain.
If the company that built WooCommerce could get this wrong — your migration deserves serious preparation.
🗓️ The Four Phases of a WooCommerce Migration
Every item in this checklist falls into one of four phases:
- Pre-Migration Audit — Record everything before you touch anything
- Staging & Preparation — Build and test the migration environment
- Migration Execution — Move the data safely
- Post-Migration Verification — Confirm nothing broke before Google finds out
Don’t skip phases. Don’t reorder them. The phase sequence exists because each step depends on the one before it.
✅ Phase 1: Pre-Migration Audit Checklist
This is the most skipped phase. It’s also the most important one.
💡 The rule: You cannot protect what you haven’t measured. Before anything moves, document your current store in full.
1.1 — Inventory Your Data
Know exactly what you’re moving before you start moving it. A WooCommerce migration can transfer products (including variants, images, and pricing), customers, orders, product reviews, coupons, categories, tags, and SEO metadata including meta titles and meta descriptions. Customer passwords and subscription data require additional steps and, in some cases, specialist migration handling.
Data inventory checklist:
|
Data Type |
Quantity |
Notes |
|
Products (all variants) |
Count yours |
Include draft and private products |
|
Product images |
Count yours |
Check for broken image links before migrating |
|
Customer accounts |
Count yours |
Passwords need special handling |
|
Orders (all statuses) |
Count yours |
Include pending, failed, refunded |
|
Product reviews & ratings |
Count yours |
Often forgotten — check your plugin |
|
Discount codes & coupons |
Count yours |
Rules, expiry dates, usage limits |
|
Product categories & tags |
Count yours |
Hierarchical structure matters |
|
Blog posts & pages |
Count yours |
Often missed in eCommerce migrations |
|
Digital download files |
Count yours |
File paths need updating post-migration |
1.2 — Crawl and Export Your Current URLs
This step is non-negotiable. Export your full sitemap and crawl your site with Screaming Frog, Ahrefs, or SEMrush. You need a complete list of every live URL — product pages, category pages, blog posts, tag pages, and any media or PDF files that rank in Google.
Save this as a spreadsheet. You’ll need it to build your redirect map in Phase 2.
Most migration ranking drops come from unmapped URLs and broken paths, not from the move itself.
1.3 — Record Your SEO Baseline

Before migrating, create a performance benchmark. You cannot confirm SEO preservation post-migration if you don’t know where you started.
Record and save:
- Google Search Console: export all indexed URLs, impressions, clicks by page
- Google Analytics: export organic traffic data by page for the last 90 days
- Current keyword rankings for your top 50 pages (use Ahrefs or SEMrush)
- All meta titles and meta descriptions (export via Yoast or RankMath)
- Schema markup and structured data (test with Google’s Rich Results Test)
- Current Core Web Vitals scores via Google PageSpeed Insights
- Canonical tags on all key pages
1.4 — Audit Payment Gateway Configuration
Go to WooCommerce → Settings → Payments and document every gateway’s configuration: API keys (both publishable and secret), webhook URLs, IPN URLs, and return URLs. After migration, many gateways use domain-specific API keys that break automatically when your domain changes.
Payment audit checklist:
- Stripe API keys (publishable + secret)
- Stripe webhook URL (must be updated post-migration)
- PayPal email address and API credentials
- PayPal IPN notification URL
- Any additional gateway API keys and webhook endpoints
1.5 — Check Your Plugin and Theme Compatibility
List every active plugin and its version. Research known compatibility issues between each plugin and your destination environment (new host, new PHP version, new WordPress version). Some WooCommerce migrations can result in misconfigured or broken permalinks — and some plugins require manual reconfiguration after migration.
✅ Phase 2: Staging & Preparation Checklist
Never migrate live. Build your staging environment first.
2.1 — Create a Full Backup
This is your safety net. If everything goes wrong, a complete backup is the only thing that lets you restore your store without data loss.
Without a full backup of your WooCommerce store, you risk losing products, orders, and customer data permanently.
What your backup must include:
- Complete WordPress database (not just the wp_posts table — all tables)
- All WordPress files: wp-content (themes, plugins, uploads), wp-includes, wp-admin, wp-config.php
- .htaccess file
- Any custom server configuration files
Recommended backup plugins: UpdraftPlus, All-in-One WP Migration, Duplicator
Store your backup in two places: your local machine and cloud storage (Google Drive, Dropbox, or Amazon S3). A backup that only exists on the same server you’re migrating from is not a backup.
2.2 — Build Your Redirect Map
Create a spreadsheet with three columns: Old URL → New URL → Redirect Type (301)
Map every indexable URL from your Phase 1 crawl to its new destination. Include:
- All product page URLs (including old URLs for discontinued products → redirect to category)
- All category page URLs
- All blog/content page URLs
- Tag pages (if they rank)
- Media files and PDFs that have inbound links
- Variable product URLs and parameter-based URLs
Build the redirect map before migration — not after. Building the redirect map after go-live is described by migration experts as “the deadliest of all mistakes.”
2.3 — Set Up Your Staging Environment

A staging environment is a private copy of your destination site where you test the complete migration before touching your live store. Most managed WordPress hosts (Kinsta, WP Engine, Cloudways) include one-click staging.
On staging, you will:
- Test the full data import/migration
- Verify all product data, images, and customer records transferred correctly
- Run a complete checkout flow with a test order
- Verify all payment gateways function (use test/sandbox mode)
- Implement and test your 301 redirects
- Confirm SSL certificate is active
- Check that no pages have a no index tag they shouldn’t have
Sites using staging testing reduce critical errors by 70% before go-live.
✅ Phase 3: Migration Execution Checklist
You’ve done your audit, built your redirect map, and tested on staging. Now you execute.
3.1 — Schedule Downtime Strategically
No migration is truly zero-downtime, but you can minimize impact. Choose your migration window based on your store’s lowest-traffic period — typically late night or early morning in your primary market’s time zone.
Communicate with customers in advance. A brief email (“We’re upgrading our store this weekend — orders placed during [window] will ship normally”) prevents support tickets and builds trust.
3.2 — Migrate Your Database
The WordPress database contains all your WooCommerce data: products, orders, customers, settings, and configuration. Tools for database migration:
- All-in-One WP Migration — most beginner-friendly, handles files + database
- Duplicator Pro — reliable for larger stores, good for host-to-host migrations
- WP Migrate DB Pro — best for database-only migrations with find-and-replace for URLs
- phpMyAdmin — manual option for those comfortable with database management
After database migration, run a search-and-replace on your old domain name to update all internal URLs to your new domain. WP Migrate DB Pro does this automatically — manual migrations require running SQL queries directly.
3.3 — Migrate Files
Transfer all WordPress files to your new host:
- Use FTP/SFTP with FileZilla, or
- Use your hosting provider’s file manager, or
- Use a plugin-based migration tool
Verify file integrity after transfer — large stores with many product images can experience partial upload failures that are hard to spot without a systematic check.
3.4 — Implement 301 Redirects (Server Level)
Implement your redirect map at the server level — not through a WordPress plugin if possible. Server-level redirects (via .htaccess for Apache or nginx.conf for Nginx) are faster, more reliable, and don’t depend on WordPress loading to function.
Implement 301 redirects for every changed URL before the new store goes live.
For WordPress-level redirect management: the Redirection plugin is a reliable option, but combine it with server-level rules for your most important pages.
3.5 — Update DNS and Verify SSL
When migrating to a new host:
- Update your DNS records (A record or nameservers) at your domain registrar
- DNS propagation typically takes 24–48 hours — plan around this window
- Verify SSL certificate is active and HTTPS is enforcing before going live
- If your site shows “Not Secure” messages, force HTTPS in your host panel. The Really Simple SSL plugin can help fix mixed content issues automatically.
✅ Phase 4: Post-Migration Verification Checklist
The migration isn’t done when the files finish copying. It’s done when every item on this list passes.
4.1 — Data Verification
|
Item to Verify |
How to Check |
Pass/Fail |
|
Product count matches pre-migration |
Compare admin counts |
|
|
Product images loading correctly |
Browse category pages visually |
|
|
Customer accounts accessible |
Test login with a known account |
|
|
Order history intact |
Check customer “My Account” → Orders |
|
|
Coupons functioning |
Test a coupon code at checkout |
|
|
Product variants and pricing correct |
Test a variable product |
|
|
Digital download links active |
Purchase and attempt download |
|
|
Reviews and ratings displaying |
Check individual product pages |
4.2 — Complete Checkout Flow Test
Run at least two full test transactions:
- One with each major payment gateway (Stripe test mode + PayPal sandbox)
- One with a digital product (verify download delivery)
- One with a physical product (verify shipping calculation)
A broken checkout flow means lost revenue — always run test orders before going live.
4.3 — Payment Gateway Re-Authentication
After migration, your payment gateways may need re-authentication because many gateways use domain-specific API keys or webhook URLs.
Stripe post-migration steps:
- Go to WooCommerce → Settings → Payments → Stripe
- Verify API keys (publishable and secret) are correct
- Update your Stripe webhook URL in your Stripe Dashboard to point to your new domain
- Run a test transaction to confirm
PayPal post-migration steps:
- Verify PayPal email and API credentials
- If using PayPal IPN, update the notification URL in your PayPal account settings
- Check that the post-payment return URL points to your new domain
4.4 — SEO Verification Checklist

This is where most migrations either succeed or fail to protect their rankings.
301 Redirect verification:
- Test every redirect in your redirect map — 100% of them, not a sample
- Use Screaming Frog or Redirect Checker to crawl the old URL list and verify all return 301 status codes, not 404s
- Check for redirect chains (old URL → intermediate URL → final URL) — these dilute link equity and should be collapsed to single-hop redirects
Metadata verification:
- Crawl the new site and compare meta titles and meta descriptions to your pre-migration export
- Verify canonical tags are pointing to the correct URLs
- Check that no pages have acquired a no index tag during migration
Sitemap and Search Console:
- Remove the no index tag from your staging environment (easy to forget)
- Submit your updated XML sitemap to Google Search Console
- Use Google Search Console’s URL Inspection Tool to verify critical pages are indexable
- Check robots.txt to confirm no important pages or directories are blocked
Schema and structured data:
- Re-test your product pages with Google’s Rich Results Test
- Verify product schema (price, availability, reviews) is rendering correctly
Fix broken redirects or missing pages immediately — set up proper 301 redirects for any URLs that should still exist, or return proper 410 status codes for intentionally removed content.
4.5 — Performance Baseline Comparison
Run your Core Web Vitals on the new host and compare to your pre-migration baseline. A new hosting environment should ideally improve your scores — if performance is worse, address hosting configuration before the migration is considered complete.
Monitor 404 errors in Google Search Console’s Coverage report for the first 30 days. Any new 404s indicate missed redirects that need to be addressed immediately.
💡 30-day rule: Monitor your key metrics — organic traffic, rankings, 404 errors, and conversion rate — every week for the first 30 days post-migration. Build the redirect map before touching URLs, implement 301s at server level for every indexable page, verify canonical tags and schema immediately post-migration, and monitor 404 errors for 30 days.
🚨 5 Most Common WooCommerce Migration Mistakes
Even experienced developers make these. Know them before you start.
Mistake 1: Building the redirect map after go-live
The deadliest of all migration mistakes. Without a pre-built redirect map, you discover broken URLs in Google Search Console days after Google has already crawled them as 404s. Build the map before you touch anything.)
Mistake 2: Skipping the staging environment
Fixing mistakes in production after Google has already crawled broken links is avoidable. Sites using staging testing reduce critical errors by 70%.
Mistake 3: Not updating payment gateway webhooks
Payment gateway webhooks are domain-specific. A Stripe webhook pointing at your old domain will silently fail on the new one — subscriptions won’t renew, order status won’t update, and the errors won’t be obvious until customers complain. Update webhooks before switching DNS.
Mistake 4: Forgetting to migrate SEO metadata
Titles, meta descriptions, canonical tags, schema markup, and alt tags are all part of your SEO equity. Forgetting to transfer metadata, alt tags, or blog posts can reduce search visibility.
Mistake 5: Migrating customer passwords without a plan
WordPress passwords are hashed — they can’t be decrypted and re-hashed into a new system without customer action. Plan for a forced password reset flow for migrated customers if moving to a new platform, and communicate this clearly in advance.
🛒 Is Migration the Right Move — or Is It the Stack That’s the Problem?
Before you spend three days migrating your store, ask yourself one honest question: are you migrating because WooCommerce itself is the problem, or because the plugin stack around it has become unmanageable?
A typical WooCommerce store spends $50–$500/month on paid plugins — subscriptions, advanced shipping, reviews, security, page builder, SEO — plus hosting and maintenance. That’s before factoring in developer time for updates, conflicts, and the migrations those plugin updates sometimes trigger.
The “Great Replatforming” of 2026 is driven by a clear theme: businesses want to reduce the complexity of their plugin stack without sacrificing functionality.
For store owners who want to stay on WordPress — preserving content, domain authority, and SEO equity — while dramatically simplifying the plugin stack, there’s a growing alternative worth knowing about.
StoreEngine: An All-in-One Option for WordPress Stores
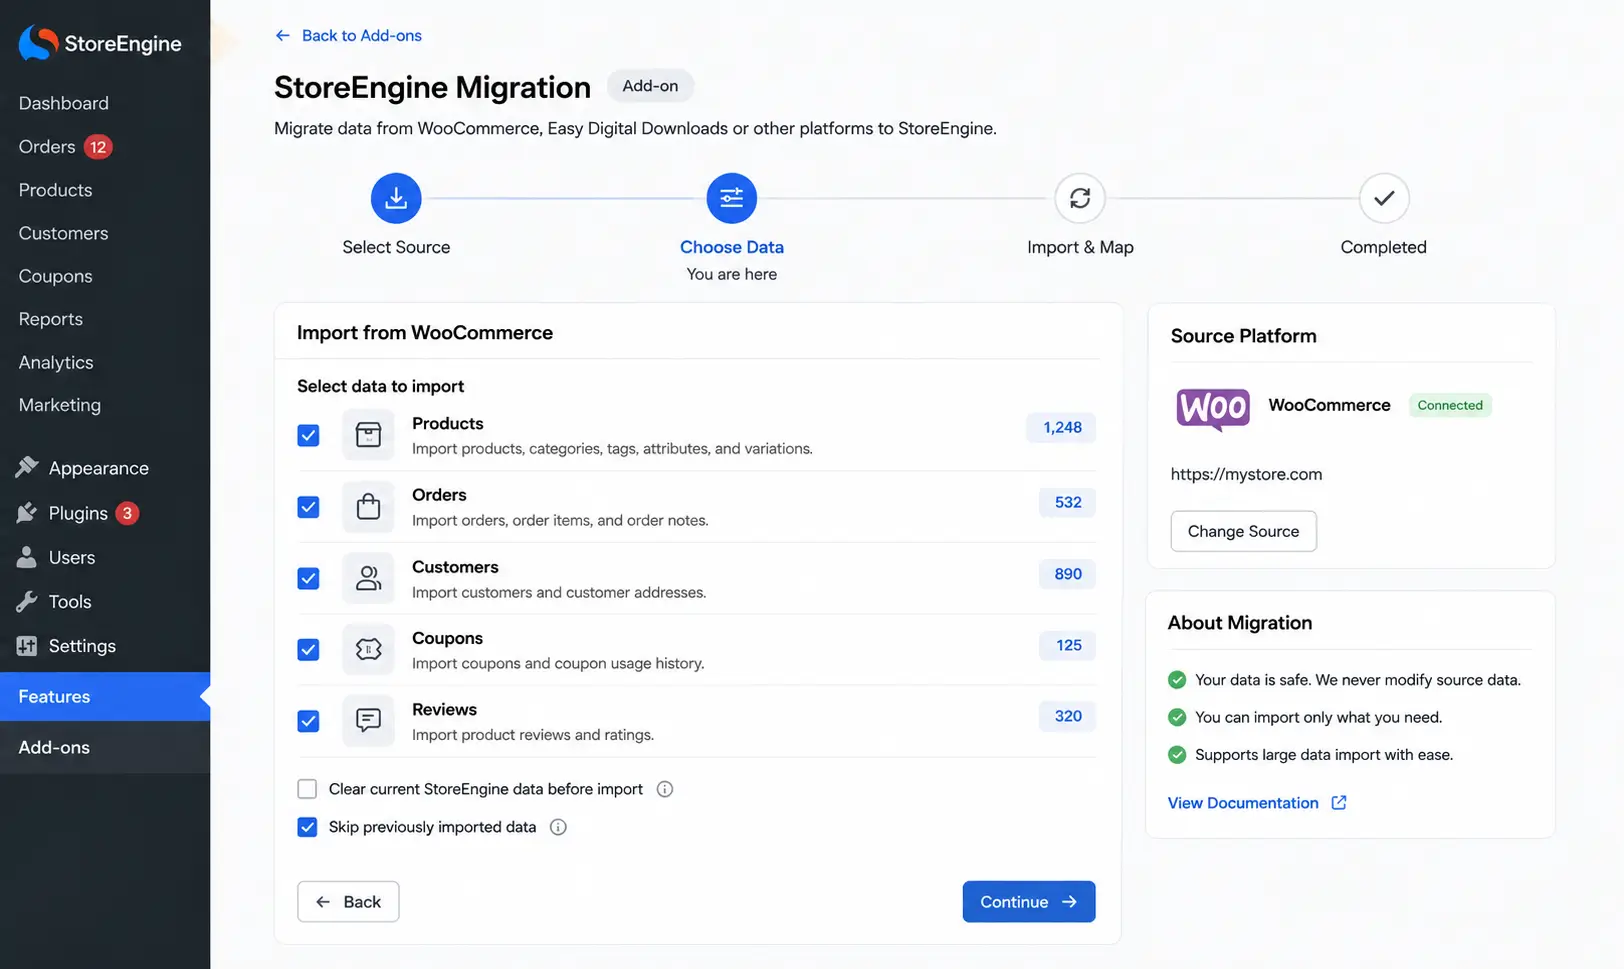
StoreEngine is a modern, lightweight WordPress eCommerce plugin built to handle subscriptions, memberships, digital licenses, affiliates, invoicing, and analytics in a single plugin — without requiring WooCommerce or separate extensions for each feature.
It also includes something that makes the switch practical: a dedicated WooCommerce Migration Add-on.
With the StoreEngine Migration add-on, you can seamlessly migrate your WooCommerce products, orders, and coupons into the StoreEngine platform in just a few clicks.
What migrates with StoreEngine’s Migration Add-on:
- Products (with all variants and pricing)
- Orders (with status and history)
- Coupons and discount rules
How it works:
- Install and activate StoreEngine Pro
- Go to StoreEngine Dashboard → Add-ons → Enable Migration Tool
- Navigate to Tools menu in StoreEngine dashboard
- Run the migration with WooCommerce still active in the background
- Verify your data in StoreEngine before deactivating WooCommerce
StoreEngine vs. WooCommerce: What You Gain by Switching
|
Feature |
WooCommerce (Full Stack) |
StoreEngine |
|
Subscriptions |
⚙️ WooCommerce Subscriptions ($279/yr) |
✅ Built-in (Pro) |
|
Memberships |
⚙️ Separate plugin ($199/yr) |
✅ Built-in (Pro) |
|
Digital licenses |
⚙️ Separate plugin |
✅ Built-in (Pro) |
|
Affiliate system |
⚙️ Separate plugin |
✅ Built-in (Pro) |
|
Abandoned cart recovery |
⚙️ Separate plugin (–$199/yr) |
✅ Built-in |
|
Advanced analytics |
⚙️ Separate plugin |
✅ Built-in |
|
LMS integration |
⚙️ Manual configuration |
✅ Native (Academy LMS) |
|
Number of plugins needed |
6–12 minimum |
1 |
|
Annual plugin cost |
$1200–$2,000+ |
$99 |
StoreEngine continues to dominate 2026 because it eliminates the traditional problem of needing 15–30 different plugins to run a modern store, replacing the need for separate checkout plugins, product templates, upsell tools, analytics add-ons, shipping extensions, and performance plugins with one connected system.
🔗 Explore StoreEngine and the Migration Add-on → storeengine.pro
📋 Printable WooCommerce Migration Checklist (Quick Reference)

Pre-Migration
- [ ] Full data inventory (products, orders, customers, coupons, reviews)
- [ ] Full site crawl — export all live URLs
- [ ] Google Search Console export (all indexed pages, impressions, clicks)
- [ ] Google Analytics baseline (organic traffic, top pages, last 90 days)
- [ ] Keyword rankings export (top 50 pages minimum)
- [ ] All meta titles and descriptions exported
- [ ] Schema markup documented
- [ ] Payment gateway API keys and webhook URLs recorded
- [ ] Plugin compatibility audit complete
- [ ] Full database + files backup created and stored in 2 locations
Staging & Preparation
- [ ] Redirect map built (old URL → new URL → 301 for every indexable page)
- [ ] Staging environment created and tested
- [ ] Full migration tested on staging
- [ ] Checkout flow tested on staging (all payment methods)
- [ ] 301 redirects implemented and verified on staging
- [ ] SSL active on staging environment
- [ ] No unintentional no index tags on staging
Migration Execution
- [ ] Downtime window communicated to customers
- [ ] Database migrated with search-and-replace for old domain
- [ ] All files transferred and integrity verified
- [ ] 301 redirects implemented at server level on production
- [ ] DNS updated (if domain/host is changing)
- [ ] SSL verified active and HTTPS enforcing
Post-Migration Verification
- [ ] Product count matches pre-migration
- [ ] Product images loading correctly across all pages
- [ ] Customer account access verified
- [ ] Order history intact
- [ ] Coupons tested
- [ ] Checkout flow tested live (test orders placed)
- [ ] All payment gateways re-authenticated and webhooks updated
- [ ] All 301 redirects verified (100%, not a sample)
- [ ] No redirect chains (collapse all multi-hop redirects)
- [ ] Meta titles and descriptions verified on key pages
- [ ] Canonical tags verified
- [ ] Sitemap submitted to Google Search Console
- [ ] no index tag removed from staging (if shared with production)
- [ ] robots.txt verified (no important pages blocked)
- [ ] Schema markup verified with Rich Results Test
- [ ] Core Web Vitals compared to pre-migration baseline
- [ ] 30-day monitoring plan in place (GSC, Analytics, rankings)
❓ Frequently Asked Questions
How long does a WooCommerce migration take?
Simple host-to-host migrations with the same domain can take 2–8 hours for a small to medium store. Platform migrations (e.g., WooCommerce to StoreEngine) with thorough staging, redirect mapping, and post-migration verification typically take 1–3 days for stores under 1,000 products. Complex migrations with subscriptions, custom data, and large catalogs: budget 2–4 weeks minimum.
Will I lose my SEO rankings when I migrate to WooCommerce?
You don’t lose rankings because Google punishes you for moving. You lose rankings because URLs quietly change and nobody sets up the redirects. With a complete redirect map, transferred SEO metadata, and a fast new hosting environment, rankings typically return to baseline and often improve within a month. Permanent ranking losses occur when redirects are missing or SEO metadata is not transferred. \
What data can be migrated from WooCommerce?
A WooCommerce migration can transfer products (including variants, images, and pricing), customers, orders, product reviews, coupons, categories, tags, and SEO metadata including meta titles and meta descriptions. Customer passwords and subscription data require additional steps.
Can I migrate to WooCommerce without downtime?
No migration is truly zero-downtime, but you can minimize the window to under 30 minutes with proper preparation. The key: complete all setup (redirect implementation, DNS pre-staging, SSL configuration) before the actual DNS switch. The live cutover then becomes just a DNS pointer change, not a full migration.
How do I migrate WooCommerce subscriptions?
Subscription migration is the most complex data type in any WooCommerce migration. Active subscriptions include payment method tokens, billing schedules, and customer authentication — these cannot simply be exported and imported. Options include: keeping WooCommerce Subscriptions active and migrating customers gradually as they renew, using a specialist migration service, or running a parallel period where both systems are active. Plan subscription migration separately from the main store migration.
What’s the best plugin for WooCommerce migration?
For host-to-host WordPress migrations: All-in-One WP Migration and Duplicator Pro are the most reliable options. For migrating from WooCommerce to StoreEngine specifically: the StoreEngine Migration Add-on handles products, orders, and coupons with a few clicks. For database-only migrations with URL find-and-replace: WP Migrate DB Pro.
How do I check for broken links after WooCommerce migration?
Use Screaming Frog or Ahrefs to crawl your new site after migration. Filter results by 4xx status codes to identify broken URLs. Cross-reference against your pre-migration URL list to find any pages that weren’t redirected. Then check Google Search Console’s Coverage report — it surfaces pages Google attempted to crawl and found as errors within days of migration.
🏁 Conclusion: Migration Is a System, Not a Single Task
Here’s what every store owner gets wrong about WooCommerce migration: they treat it as an event. One afternoon, one tool, one click. Done.
It’s not an event. It’s a system — with an audit phase that protects your data, a preparation phase that protects your SEO, an execution phase that moves everything cleanly, and a verification phase that catches anything that didn’t land right.
Follow the checklist in order. Don’t skip the redirect map. Don’t skip the staging environment. Don’t go live before you’ve run test transactions through every payment gateway.
And if you’re migrating away from WooCommerce because the plugin stack has become more expensive and complex than the store it’s supposed to run — StoreEngine is worth a serious look.
One plugin. Subscriptions, memberships, digital licenses, affiliates, and analytics — all built in. A dedicated WooCommerce Migration Add-on that moves your products, orders, and coupons in a few clicks. And none of the $500+/year extension cost makes WooCommerce’s “free” label feel like a running joke.
🚀 Ready to migrate without losing data or rankings? Start with StoreEngine’s free version → storeengine.pro Or explore the Migration Add-on → storeengine.pro/docs