


This guide provides step-by-step instructions on how to install and activate the StoreEngine plugin on your WordPress website. It also explains how to activate your license to ensure you receive automatic updates, access premium features, and get ongoing support.
1. StoreEngine Installation & Activation (Overview)
This guide explains:
- How to install and activate the StoreEngine Free (Base) Plugin
- How to install StoreEngine Pro and activate
- How to activate the Pro license to receive updates and premium features
2. Server & Hosting Requirements
Before installing StoreEngine, ensure that your hosting environment meets the following requirements. This will help StoreEngine run smoothly and provide the best performance.
Minimum Requirements
- WordPress Version: 6.5 or higher
- PHP Version: 7.4 or higher
- MySQL Version: 5.8 or higher (with InnoDB support)
3. Installing StoreEngine (Free Version)
This is the standard method to install the core StoreEngine plugin, which is free and available in the WordPress Plugin Directory.
Steps:
- Log in to your WordPress Dashboard.
- Navigate to Plugins → Add New.
- In the search bar, type StoreEngine and press Enter.
- Locate the StoreEngine plugin from the search results.
- Click Install Now.
- After installation, click Activate.
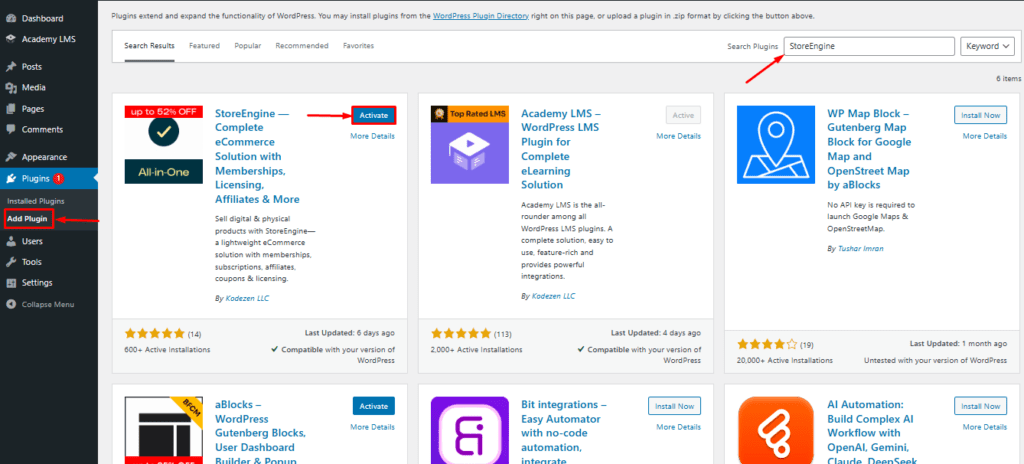
Once activated, the StoreEngine Free plugin will be ready to use.
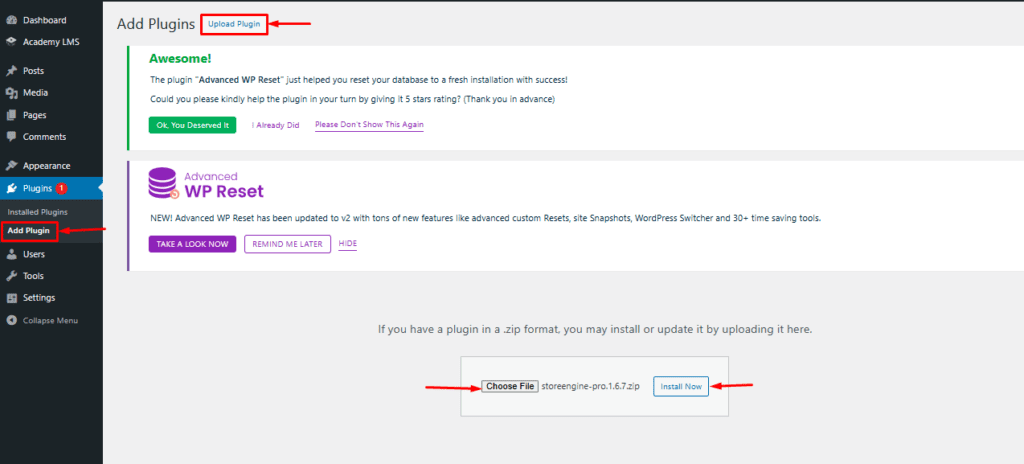
4. Installing StoreEngine Pro Version (Requires Base Plugin)
If you’ve purchased the StoreEngine Pro version for advanced features, you’ll need to upload and activate them. Ensure the Free Base Plugin (from step 1) is already installed and active before proceeding with Pro Addons.
- Download the StoreEngine Pro version .zip file from here.

- Navigate to your WordPress dashboard.
- Go to Plugins > Add New.
- At the top of the page, click the “Upload Plugin” button.
- Click “Choose File“, then select the StoreEngine Pro version.zip file you downloaded.
- Click “Install Now”.
- Once the installation is complete, click “Activate Plugin”.
5. Activating Your StoreEngine Pro License
License activation is required to receive automatic updates, bug fixes, new features, and access to support.
Activation Methods
After activating the Pro zip file, you may see a license activation notice in your WordPress dashboard. Click it to begin.
Alternatively, activate the license manually:
- Go to StoreEngine → Pro → Settings.
- Open the License Settings tab.
- Enter your license key.
- Click Activate License.

- Once activated, your license will be marked as Active, Pro features will be unlocked, and you’ll be redirected to your StoreEngine Pro account.
Don’t have the StoreEngine Pro Plugin?
You can purchase the StoreEngine Pro plugin from the official StoreEngine website. After buying and activating the plugin, all StoreEngine Pro features will be unlocked and ready to use.