


Welcome to StoreEngine, the friendly WordPress plugin that makes running an eCommerce store easier and better! While other platforms only help you sell physical and digital items, StoreEngine goes further with a simple yet powerful license management feature. This tool lets you create, track, and protect licenses for things like software or digital downloads, keeping them safe from unauthorized use. With automatic key creation, easy activation limits, and a clear dashboard to watch everything, it’s all built in—no extra add-ons needed. Get started with StoreEngine and enjoy a fast, secure way to grow your online business!
Prerequisite
The license management feature is a pro feature of StoreEngine. To use it, ensure both the free and pro latest versions of StoreEngine are activated on your site.
Steps to License Management Features
Step 1: Activate the License Addon
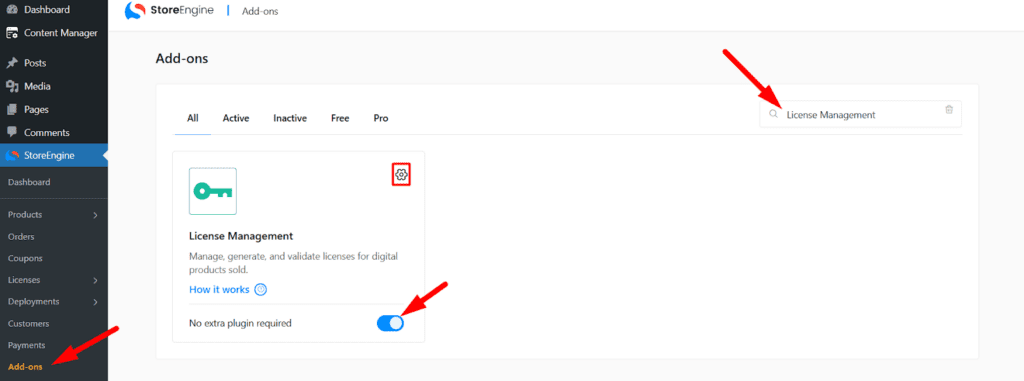
- Go to your WordPress dashboard and navigate to StoreEngine > Addons.
- Locate the License Addon in the list or search for quick pick.
- Click Activate to enable the license management feature.
- [Next steps to be added based on further instructions.]
Step 2: Select a Product for License Management
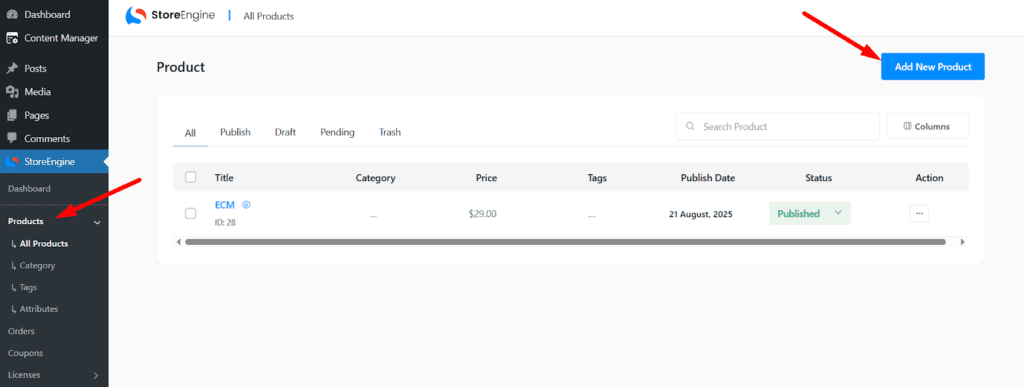
- Go to your WordPress dashboard and navigate to StoreEngine > Products.
- Click “Add New” or edit an existing product where you want to implement license management.
Step 3: Configure Product Details
- Enter a Title for your product (e.g., “Advanced Video Editor Software”).
- Add a Description to provide details about the product (e.g., “A powerful tool for editing videos with advanced features”).
- Under Product Type, ensure Digital Product is selected (default setting).
- Within Digital Product, choose Versioned (Software) and enable license creation toggle.
- Click Save in the top right corner to store your settings.
Step 4: Access Version Management
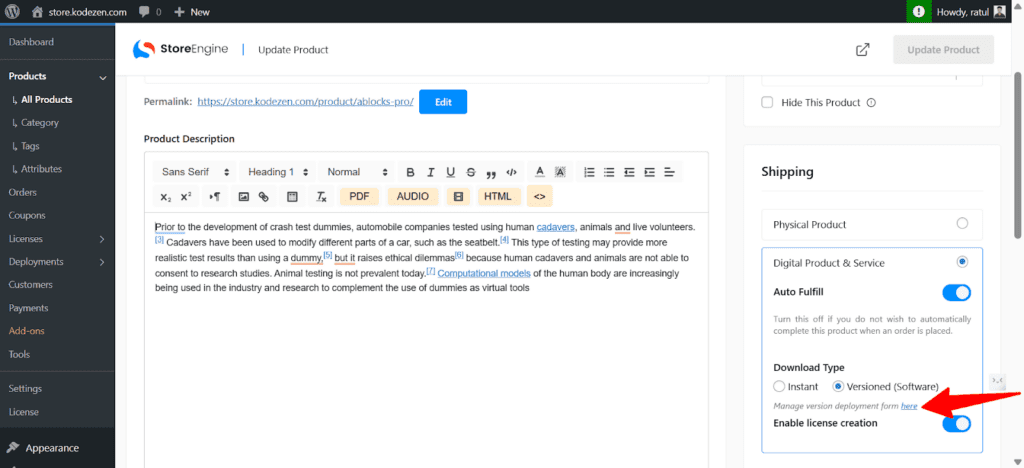
- After saving, a notification labeled Manage version deployment form here will appear.
- Click the notification link to navigate to the product adding and managing section.
Step 5: Upload a Product Version
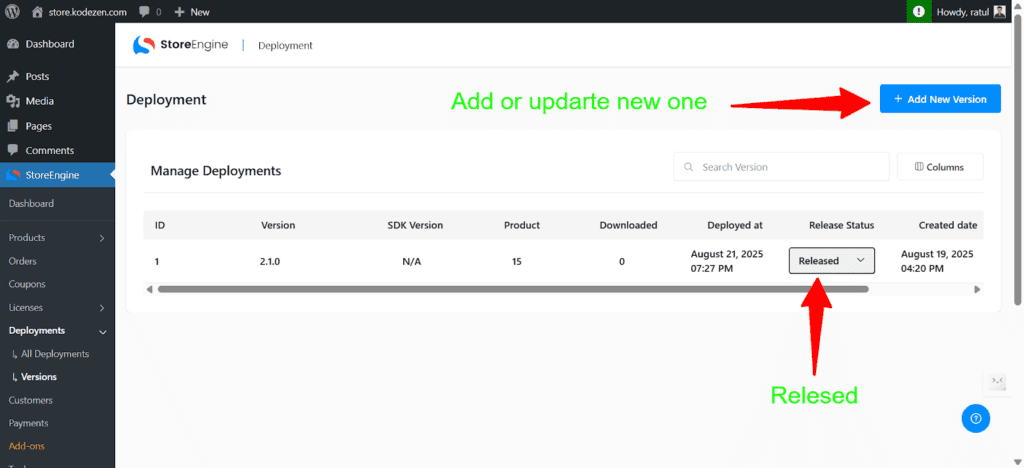
- In the new page, click Manage to start uploading a product.
- Click Add New Version to create a new version of your product.
- Upload the product file by following the on-screen prompts.
Integrate StoreEngine SDK
You’re almost there. now you can integrate the StoreEngine WordPress SDK with your plugin/theme and deploy your product.
Follow the instructions to complete the SDK setup.
Step 6: Enable Payment Methods and Configure Settings
Now just enable and setup the payment method you like most and configure the necessary settings.
Advanced License Security (For Migration & Custom Setup)
Important Note for Advanced Users (Optional)
StoreEngine license management system automatically generates and validates licenses securely for most use cases.
In normal usage, you do not need to change or configure anything manually.
However, this note is important only if:
- You are migrating your store to another environment
- You want full manual control over license generation security
- You plan to customize or move your WordPress installation
- You intentionally want to change how licenses are generated internally
Optional: Custom License Security Configuration
For advanced users, StoreEngine allows you to define custom secret keys used during license generation and verification.
These keys act as internal security salts to ensure license uniqueness and validation consistency.
You can define them inside your WordPress wp-config.php file.
define(‘STOREENGINE_LICENSE_SECRET’, ‘your-random-secret-string’);
define(‘STOREENGINE_LICENSE_SALT’, ‘your-random-salt-string’);
Guidelines:
- Use random strings (around 64 characters)
- Letters, numbers, and symbols are recommended
- These values are used internally by StoreEngine
- Additionally, you can use the WordPress.org Secret Key & Salt Generator to generate random secret keys.
⚠️ Important Warning
Only change the license generator secret key and salt constants before issuing any licenses.
Changing these values after licenses are generated will invalidate all existing licenses, and previously issued license keys cannot be validated again.
Conclusion
With StoreEngine’s license management, you now have a robust, all-in-one solution to protect and manage your digital products effortlessly. Follow these steps to set up your store, and enjoy the simplicity and power at your fingertips. Should you face any challenges along the way, our dedicated support team is here to help—reach out anytime for assistance and keep your eCommerce journey smooth and successful!