


StoreEngine’s Abandoned Cart Addon helps bring customers back by tracking abandoned carts and sending automated, personalized cart-recovery emails. When shoppers add items to their cart but leave without completing the purchase, this system follows up with timely reminders, optional discounts, and fully customizable email templates. It’s seamlessly integrated into StoreEngine and designed to boost conversions with minimal effort.
Why Use Abandoned Cart Recovery in StoreEngine?
Enabling the Abandoned Cart Addon gives your store an immediate advantage. It helps you:
- Recover abandoned carts with automated reminder emails.
- Increase conversions by bringing back customers who showed purchase intent.
- Improve customer engagement with personalized follow-up communication.
- Boost revenue with automated incentives like discount coupons.
- Understand user behavior through early tracking of cart activity.
- Reduce manual workload with a fully automated follow-up system.
This feature ensures every abandoned cart becomes an opportunity to win the customer back.
Prerequisites
Before using the Abandoned Cart feature, make sure:
- You have the latest versions of StoreEngine and StoreEngine Pro installed and activated.
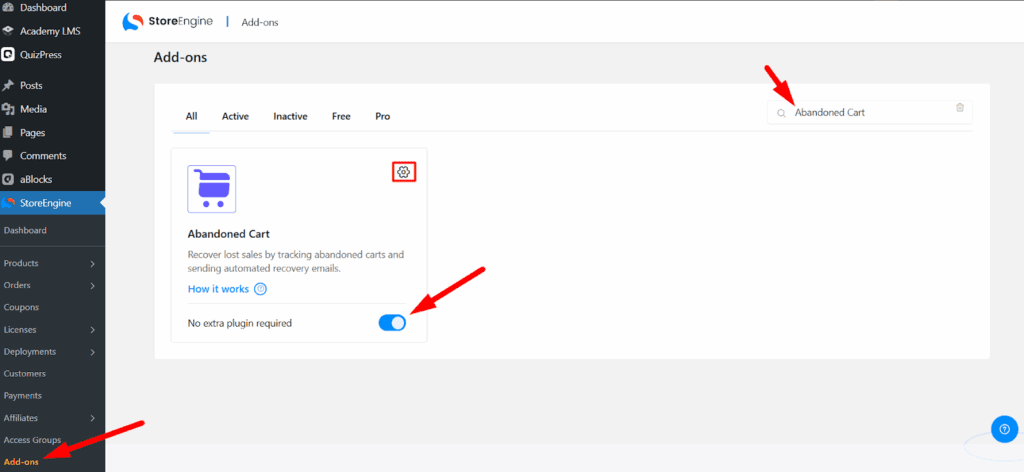
- The Abandoned Cart Addon is enabled from StoreEngine → Addons.
- The Email Notification Addon is enabled to allow sending cart-recovery emails.
Once these are active, you’re ready to configure your abandoned cart recovery system.
Accessing the Abandoned Cart Settings
You can open the configuration panel in two ways:
- Click Settings directly from the Abandoned Cart Addon.
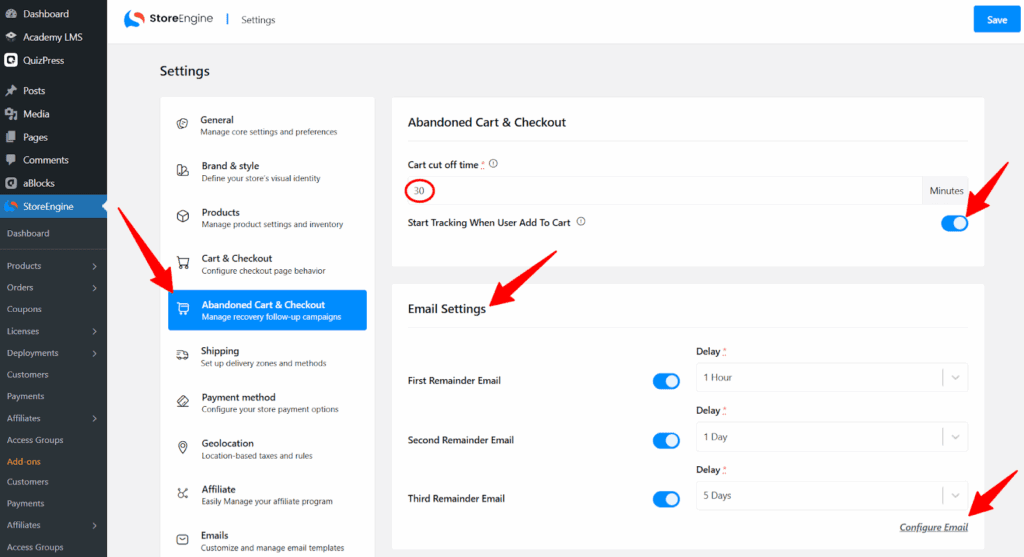
- Or go to StoreEngine → Settings → Abandoned Cart & Checkout.
Inside this menu, you’ll find all tracking, email, and discount configuration options.
Configure Abandoned Cart Tracking
Cart Cut-off Time
Set the Cart Cut-off Time to define when a cart is considered abandoned.
This value represents the time interval (in minutes) after the last activity.
For example:
- If you set 30 minutes, any cart with no action after 30 minutes will be marked abandoned.
This ensures accurate tracking and timely recovery attempts.
Start Tracking When User Adds to Cart
By default, abandoned cart tracking usually starts only after a customer enters checkout details.
Enabling this option lets StoreEngine start tracking as soon as a logged-in user adds an item to their cart.
This helps you capture more abandoned carts, especially earlier in the shopping process.
Email Settings
The Email Settings section allows you to automate and schedule recovery emails. You can enable up to three reminder emails, each with its own delay time.
First Reminder Email
Sends immediately after the cart becomes abandoned.
You can set the delay time—for example, 1 hour after abandonment.
Second Reminder Email
Target users who did not respond to the first email.
You can schedule it—such as after 24 hours or any preferred duration.
Third Reminder Email
A final attempt to bring the customer back—often used to include special offers or discounts.
You can delay this one longer, such as 5 days after abandonment.
Configure Email

You can fully customize every reminder email:
- Subject line
- Email heading
- Body content
- Buttons
- Discount placeholders
- Variables for personalization
This lets you match your brand tone and communication style easily.
Configure Abandoned Cart Recovery Email Template

Inside each reminder email, the template editor gives you complete flexibility.
You can:
- Enable/disable the specific email.
- Change the subject and heading.
- Modify the message body using a full editor.
Add elements like:
- Discount details
- Cart items
- Cart totals
- Recovery button
- Customer information
All available variables are listed below the editor. Adding them automatically inserts personalized data when the email is sent.
Live Template Preview: A real-time preview appears on the right side of the screen showing every change.
Discount Settings

The Discount Settings section lets you create special offers to encourage customers to complete their purchase.
You can:
- Enable/disable the discount feature
- Choose discount type: Percentage or Fixed
- Enter the discount amount
- Set a coupon expiration period (e.g., 7 days)
If the Discount Expires option is enabled, the expiration notice will appear inside the recovery email.
When to Send the Discount?
You can decide during which email the discount coupon will be included:
- With the first reminder
- With the second reminder
- With the third reminder
This gives full control over how persuasive your recovery strategy should be.